A Summer at American Express
This summer I was fortunate enough to be one of the American Express Tech interns, based in Burgess Hill. Over the 10 week internship I joined one of their many teams to help build a new microservice platform for the company. Alongside this, I was given plenty of great opportunities to learn new skills and expand my network.
In this blog post, I will talk about some of the skills I have learnt during my time at AmEx.
Microservices
The team I joined were building a set of microservice, as well as a framework to help in building microservices. Microservices are smaller applications which join together to make a larger application.
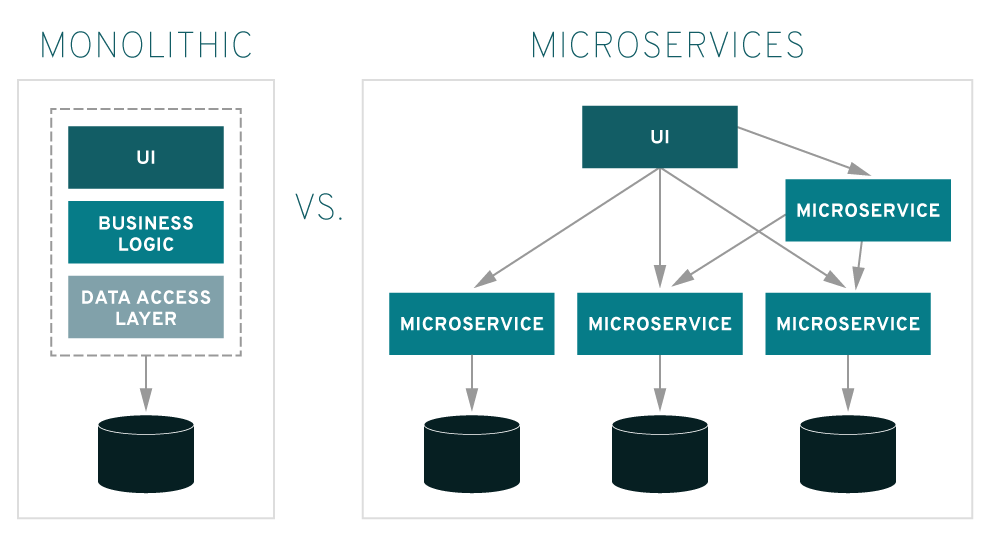
There are several benefits to using a microservice architecture. One of the biggest advantages is that each microservice can be developed by a small team within the organisation. Large monolithic applications can be hard to maintain. Over time, the team members who built an application may leave the organisation, and the knowledge of how the application works can be lost. Therefore pieces of software tens of years old (and there is usually a number of those in larger companies, especially banks), can be incredibly difficult to maintain. However, if the application was built with the microservice architecture, then there is more likely to be someone with knowledge of the service. If not, the service should be small enough that it could be understood by newer employees.
Another advantage is scalability. If parts of the system experience heavy traffic, then extra copies of a service can be run up to increase throughput. This is especially useful when automated through cloud bursting. Similarly, if a service was to fail, a new one could be brought up quickly. If one service was to fail, the rest of the application should be built robustly so that it can continue to function at it’s best.
However, there are some disadvantages to using microservices. Each service will have to communicate with any number of other services. This can be quite complex to implement successfully. This also highlights that debugging the application can be difficult, as you may need to check through several different services to find the source of your issue.
Event Sourcing
Event sourcing is a technique that works particularly well with the microservice architecture as it allows for loosely coupled systems. Each change of application state is recorded as an event, and each service communicates through events. This is great if you need to create an audit trail, which is quite a common necessity.
As the application state is derived from a series of events, the current state can be rebuilt by “replaying” the event sequence. This is very useful for any system downtime, as well as providing several other benefits.
Replaying events means that you can reconstruct the system state at any given point in time. This has multiple benefits, namely for a company to experiment with how changing certain parameters can change future outcomes (perhaps a bank wants to experiment with an interest rate, for example). It also allows for great debugging capability as a test environment can be created, and events can be replayed, rewound and edited.
However, all of the events generated by the system need to be stored. This can result in a huge volume of space needed to support the system, especially for keeping backups. This may also cause issues if the application needs to be restarted after several years of generating events, as each event will need to be replayed before the system is usable again. To solve this issue, snapshots may be generated. These store the application state at a certain point of time. Events can then be replayed from that point, increasing the speed at which the system can become usable again.
Event semantics should be considered carefully. For example, “set balance to £100” is not as useful as “add £10”, because it is much more difficult to “rewind” the former. There should also be consideration for date sensitive information such as conversion rates. These may be retrieved from external sources, so the information will have to be stored alongside the event so that the event can be replayed in the future.
Reactive Programming with Reactor 3
Reactive programming is a programming paradigm used to build non-blocking applications using data streams. In particular, we used the Reactor 3 library for Java. Reactive programming makes use of the publisher-subscriber architecture – publishers produce events and subscribers react to those events.
Reactor 3 implements two very useful publisher types: Flux and Mono.
A Flux produces a reactive sequence of 0 to N items.
After it is finished, it produces a completion signal, or an error.
Diagram explaining a Flux
However, a Mono represents a single value, or is empty.
Again, it can terminate with an error if needed.
Diagram explaining a Mono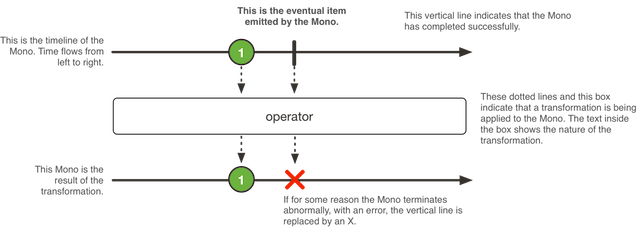
Each has their own use cases. For example, a HTTP request only produces a single response, therefore it makes sense to use a Mono as opposed to a Flux.
Another interesting feature of Reactor 3 is “backpressure”. This is where a subscriber can let a publisher know how many elements it can process. This can be useful when you need to receive requests instead of dropping them. It also helps to distribute memory load across the microservice network.
Using streams is beautiful – it allows you to use lots of nice functional code which is concise and easy to read.
For example, if you had a Flux which provides GUIDs for new users, and another flux that provides the corresponding username, you could use the following code to combine the information into a User object:
public Flux<User> zipUserInfo(Flux<String> guids, Flux<String> usernames) {
    Flux<User> users = Flux
        .zip(guids, usernames)
        .map(info -> new User(info.getT1(), info.getT2()));

    return users;
}
You can also write unit tests using StepVerifier:
@Test
public void zipUserInfoTest() {
    Flux<String> guids = Flux.just("9a80b8e8-648e-401d-b1fa-c72c1a7b2041",
                                   "7653d6b0-e281-4917-9feb-22a3fb47d687");
    Flux<String> usernames = Flux.just("Brad", "Bredley");

    Flux<User> users = myClass.zipUserInfo(guids, usernames);

    StepVerifier.create(users)
        .expectNext(new User("9a80b8e8-648e-401d-b1fa-c72c1a7b2041", "Brad"))
        .expectNext(new User("7653d6b0-e281-4917-9feb-22a3fb47d687", "Bredley"))
}
Design Patterns
Throughout my internship, I had the opportunity to talk to one of the project leaders. One of the first things he did was hand me a copy of Head First Design Patterns. Sadly, university didn’t provide a very broad introduction to design patterns, so I thoroughly recommend that you give this book a try! There are a huge number of design patterns/anti-patterns, but here are a few that I encountered.
The builder pattern is great, especially if you want immutable objects. One commonly used example of this pattern is the StringBuilder class. Generally speaking, the builder pattern allows you to write more readable code for creating complex objects with a large number of fields.
The example below uses the builder pattern to create (simplified) bank accounts.
You may want the owner and accountNumber to be private, but you may want to be able to add to the balance.
public class BankAccount {

    public static class Builder {
        private long accountNumber;
        private String owner;
        private double balance;

        public Builder(long accountNumber) {
            this.accountNumber = accountNumber;
        }

        public Builder setOwner(String owner) {
            this.owner = owner;
            return this;
        }

        public Builder setOpeningBalance(double balance) {
            this.balance = balance;
            return this;
        }

        public BankAccount build() {
            BankAccount account = new BankAccount();
            account.accountNumber = this.accountNumber;
            account.owner = this.owner;
            account.balance = this.balance;
        }
    }

    private long accountNumber;
    private String owner;
    private double balance;

    private BankAccount() {}

    public void addToBalance(double amount) {
        balance += amount;
    }
}
This makes the account partially immutable – we are unable to change the owner and accountNumber of the account, but we can update the balance.
Note that this does add a lot of boilerplate, but this can be minimised through the use of tools like Project Lombok.
You can use the builder in the following way:
BankAccount account = new BankAccount.Builder(1234L)
    .setOwner("Bradley")
    .setOpeningBalance(100)
    .build();

account.addToBalance(10);
Another interesting design pattern is “inversion of control” or “dependency injection”. This is quite a complex design pattern, and I thoroughly recommend reading this article for more information.
In essence, dependency injection allows us to create generic code that can be changed based on the dependency “injected” when the application is constructed. As a simple example, imagine you are building an application that reads data from a database. You may have several client implementations that use different database backends, such as as SQLite or MySQL. Part of the code may initially be “strongly coupled” to the database implementation it is calling. However, we can define an interface that contains all of the methods that we need to interact with a database. We can then have several concrete implementations of the interface, one for each backend.
// Here we want to use a database, but ideally be uncoupled to
// the specific database being used
public class DatabaseService {
    public void getData() {
        IDatabase database = ioc.get<IDatabase>();
        List data = database.retrieveData();
    }
}

// Interface that defines all of the methods that
// we expect an implementation of a database to use.
public interface IDatabase {
    public List retrieveData();
}

// Implementation for SQLite
public class SQLiteDatabase implements IDatabase {
    public List retrieveData() {
        // Concrete implementation for SQLite...
    }
}

// Implementation for MySQL
public class MySQLDatabase implements IDatabase {
    public List retrieveData() {
        // Concrete implementation for MySQL...
    }
}
The above code is not written for a specific dependency injection framework and is meant as a toy example.
ioc is a dependency “container” – it allows us to retrieve the dependencies we need to use.
Typically, the dependencies allocated will be declared elsewhere in the codebase.
In the case of Spring, the dependencies will be defined in an XML file.
We can then reuse the DatabaseService class across all of the clients, and control which dependency is injected so that it is correct for the client being constructed.
Testing
At university, there is very limited discussion of tools and techniques for testing software besides the existence of unit testing. The topic is very broad, and there are a wide range of possible approaches. Here I shall discuss some of the new techniques I was introduced to.
Firstly, I was encouraged to adopt a Test Driven Development (TDD) approach. This is where you write tests before you begin to implement a feature. As you develop you will see the tests begin to pass. This is a great approach as it forces you to write tests and think about edge cases that can be present in what you are implementing. It also has the added benefit of expanding the regression tests present in the codebase – the tests can be rerun to ensure that new features do not break existing ones.
However, TDD isn’t always perfect. Personally I found that sometimes it was difficult to actually write tests without knowing how the implementation was going to work. Instead, I wrote some high-level stubs which I expanded once I had reached a concrete understanding of how I wanted to implement something.
I also learned to use the Mockito framework to create “mock” objects for testing. There are a number of applications, but for a simple example imagine you are trying to test some code that interacts with an API. Ideally, you wouldn’t want to actually send a request to the API every time you run tests, especially if there are a large number of tests in your test suite. Instead, you can create a “mock” of the object, which returns a predefined response.
Additionally, using mocks allows you to test error behaviour which may otherwise be difficult to replicate for an actual implementation. This is particularly useful for systems of microservices.
In the example below we are testing the getResponseStatus method.
An implementation of ApiCaller would make requests to the API, so we create a mock ApiCaller for the purpose of testing.
// Method to be tested.
public static String getResponseStatus(ApiCaller caller) throws ApiException {
    ApiResponse response = caller.makeRequest();
    if (response.getStatus() == "200") {
        return "200: Ok";
    } else {
        throw new ApiException("Error");
    }
}

@Test
public void getResponseStatusTest() {
    // Create a mock ApiCaller
    ApiCaller mockApiCaller = mock(ApiCaller.class);
    // Stub the method, which should work as expected
    when(mockApiCaller.getStatus()).thenReturn("200: Ok");
    // Verify the behaviour
    assertEquals("200: Ok", getResponseStatus(mockApiCaller));
}

@Test
public void getResponseErrorStatusTest() {
    // Create a mock ApiCaller
    ApiCaller mockApiCaller = mock(ApiCaller.class);
    // Stub the method, which should throw an exception
    when(mockApiCaller.getStatus()).thenThrow(new ApiException("Error"));
    // Verify the behaviour
    Exception e = assertThrows(ApiException.class, () -> getResponseStatus(mockApiCaller));
    assertEquals("Bad request", e.getMessage());
}
Another interesting approach to testing is Behaviour Driven Development (BDD). BDD encourages software developers to communicate well with their non-technical and business colleagues. By creating concrete example business cases, the project requirements may become more obvious. It also forces the requirements to be less vague, which reduces the likelihood of misunderstanding.
The Cucumber framework for Java uses its own “Gherkin” syntax to create BDD tests. These tests are written in plain English and can be split into 3 sections:
- Given - the context of the test.
- When - the event that occurs.
- Then - the outcome of the event given the context.
As an example, think of a simple ATM program. A user has money in their account, and they can use the system to withdraw money. In a simple scenario, if a user tries to withdraw less money than they have in their account, they should receive a confirmation messages. However, if a user tries to withdraw more money than they have in their account they should receive an error message. We can create two cucumber test to represent these scenarios:
Feature: ATM withdrawal
    The user should be able to withdraw money from the ATM without stealing from the bank.

    Scenario: User withdraws money and they have enough in their account
        Given the user has £200.00
        When the user withdraws £100.00
        Then the user should get a confirmation

    Scenario: User withdraws money and they don't have enough in their account
        Given the user has £50.50
        When the user withdraws £100.00
        Then the user should get an error
Just by reading the above, it is very clear what each scenario/test is trying to achieve. The test itself acts as documentation.
We can then write an accompanying class that the cucumber test uses:
import io.cucumber.java.en.Given;
import io.cucumber.java.en.When;
import io.cucumber.java.en.Then;

public class Atm {
    static String withdraw(double balance, double value) {
        if (value > balance) {
            return "You don't have enough money";
        }
        return "Here's your money";
    }
}

public class Stepdefs {
    private double balance;
    private String answer;

    @Given("the user has £{double}")
    public void userBalance(double value) {
        balance = value;
    }

    @When("the user withdraws £{double}")
    public void userWithdraw(double value) {
        answer = Atm.withdraw(balance, value);
    }

    @Then("the user should get an? {string}")
    public void userGets(String result) {
        String expectedAnswer;
        if (result == "confirmation") {
           expectedAnswer = "Here's your money";
        } else if (result == "error") {
            expectedAnswer = "You don't have enough money";
        }
        assertEquals(expectedAnswer, actualAnswer);
    }
 }
As you can see, the step definitions use an annotation with a regex string which is matched to those defined in the cucumber tests. We can also supply values in the plain English test, which we have used to pass balance and withdraw amounts in the above examples.
Broadening my Horizons
My learning at AmEx didn’t stop at just my team. Every week, one of the graduates would host a talk about a technology that they work with. The talks were geared towards the interns trying out the technology on their own machine, whilst the host provided examples, information and answered questions.
Although the talks were only short, I was still able to get a small amount of hands-on experience with a wide range of the technologies, such as Maven, Python, React and Docker. Many of them seem like amazing skills to have, so I will dedicate some time to experiment with them!
One particular technology caught my eye – React. I have had very little experience with front-end development so far, so I would love to try my hand at it. In particular, React Native looks like an interesting framework to experiment with. It allows you to develop mobile apps in Javascript, which would also allow me to delve into the mobile world.
Docker also seems to be very useful tool. Specifically for my internship, it enabled me to setup the microservice network within minutes, with each service running in it’s own container. Aside from this, it also makes testing more reproducible as the environment is defined within the container.